Wiring & Installing a T568B RJ45 PLUG for Straight-Through:
The T568B is the most widely used networking connections. Majority of all connections between computers and hubs/routers utilize this type of wiring. Here we will explain how to make a "straight-through" networking jumper. For a straight-through cable, both RJ45 plugs will be wired in the T568B configuration.
|
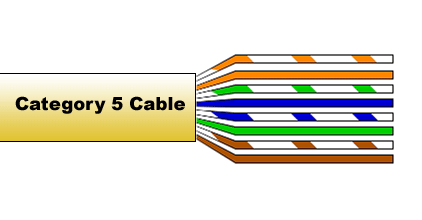
STEP 1
Strip back the outer jacket of the CAT5 about 1.5" to 2" from the end. Be extremely careful not to nick the jacket of the inner conductors. A CAT5 Cable stripper will save you a lot of time a provide a perfect strip every time. Separate and straighten the pairs and align them in the order shown below. Flatten the wires as shown so that it will slide easily into the connector and into the individual channeled areas. Once all of the wires are in the correct sequence and flat, you must trim them approximately 1/2" from the CAT5 outer jacket. Category 5 specifications require a certain number of twists per inch; even the wiring before and within the connector count. |
|
FIGURE 1
|
|
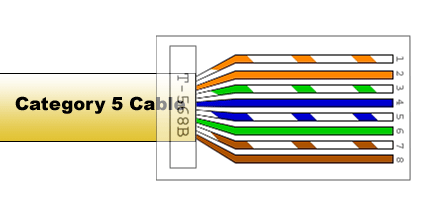
STEP 2
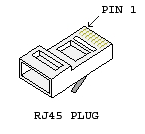
Slide the wire into the connector paying close attention to where the wires go. It is important that the wires slide into their approptiae channel and slide all the way to the end of the connector (under the gold pins). Press the cable and the jacket into the connector so that the jacket is below the rectangle on the back of the connector. When the crimp is made, this rectangle pushes down into the wire's jacket. Insert the connector into your crimping tool and make sure to crimp the entire cycle of your tool. Crimp a 2nd time to make sure all of the pins are seated properly |
|
FIGURE 2
|
 |
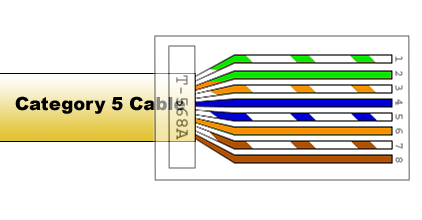
Wiring & Installing a T568A RJ45 PLUG for Cross-Over:
The only time you use cross connections in 10/100BaseT is connecting two Ethernet devices directly together without a hub. This can be two computers connected without a hub, or two hubs via standard Ethernet ports in the hubs. A cross-over crosses the transmit and receive pairs (orange and green pairs). In a cross-over cable, one end is T568B, and the other end is T568A. Remember you can only network two computers together without a hub.
|
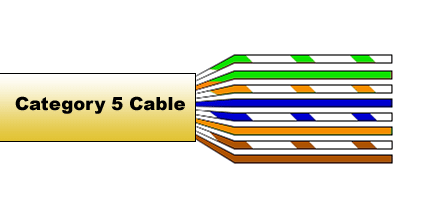
STEP 1
Strip back the outer jacket of the CAT5 about 1.5" to 2" from the end. Be extremely careful not to nick the jacket of the inner conductors. A CAT5 Cable stripper will save you a lot of time a provide a perfect strip every time. Separate and straighten the pairs and align them in the order shown below. Flatten the wires as shown so that it will slide easily into the connector and into the individual channeled areas. Once all of the wires are in the correct sequence and flat, you must trim them approximately 1/2" from the CAT5 outer jacket. Category 5 specifications require a certain number of twists per inch; even the wiring before and within the connector count. |
|
FIGURE 1
|
|
STEP 2
Slide the wire into the connector paying close attention to where the wires go. It is important that the wires slide into their approptiae channel and slide all the way to the end of the connector (under the gold pins). Press the cable and the jacket into the connector so that the jacket is below the rectangle on the back of the connector. When the crimp is made, this rectangle pushes down into the wire's jacket. Insert the connector into your crimping tool and make sure to crimp the entire cycle of your tool. Crimp a 2nd time to make sure all of the pins are seated properly |
|
FIGURE 2
|
|
 Skip to content